Pages

Friday 5 August 2016

Count number of Tiles in Revit using Dynamo


PREPARATION:
1. Dynamo Version 1.1.1.2140
2. Clockwork (Dynamo Package)
3. LunchBox (Dynamo Package)
4. Microsoft Excel 2013

WORKFLOW:
1. Try to extract those curves from Fill pattern. You can choose either one option as stated bellow;
Option 1. Select the Model Line and then Choose Pick Lines 

Option 2. Export a 2D view to CAD format (DWG) and then Link CAD (DWG) file to Revit (my preferred option)
2. Once you have extracted those curves from Fill pattern using either one Option mentioned above. It’s time to launch Dynamo.

3. In Dynamo use the following “Select Model Elements” Node for select those curves mentioned at Step 1.
Note: The following graph only able to select Model Lines. For the Link CAD (DWG) file you have to extract those curves from Linked file. (If you don’t know how to extract those curves from Linked file you can leave comments at the comment section below / email: lingkonn@gmail.com)
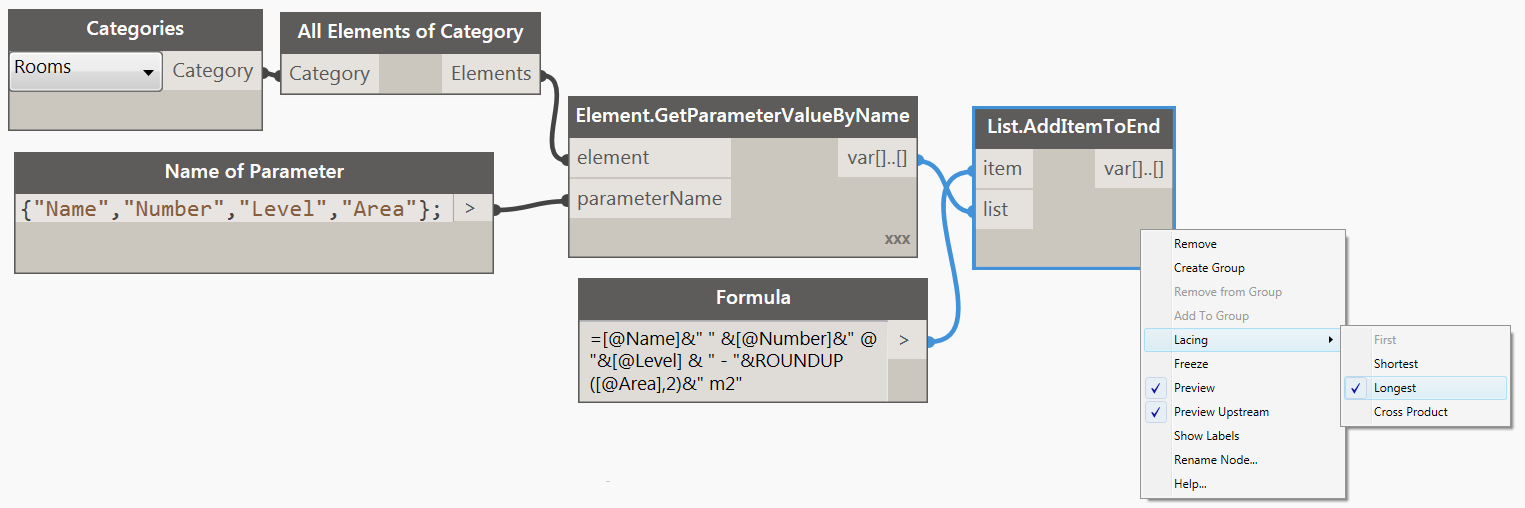
4. Use “Select Model Element” Node for select floor/ wall which you want to extract Tiles quantity.
5. For the remaining steps please follow along with the Video;
Entire Graph 

You may visit for more here
Feel Free to Ask for Finished datasets :)

Thursday 7 July 2016

Room area Chart (Real time update)


PREPARATION:
Microsoft Excel 2013 and Dynamo Version 1.1.1.1841 or higher

WORKFLOW:
1. Launch Microsoft Excel 2013 and Create a Table similar to the following;
2. Create a chart similar to the following and then save the file;

3. Now Launch Dynamo and Place "Categories" and "All Elements of Category" Nodes and connect them. Both Nodes are located at under Selection Category of Revit Library.
4. Once you have placed the above nodes it's time to place "Element.GetParameterValueByName" for extract information. It's very important to set "Lacing" to "Cross Product" if you are extracting multiple parameter value.
5. Search for "String" Node and then Copy and Paste the following formula;
=[@Name]&" " &[@Number]&" @ "&[@Level] & " - "&ROUNDUP([@Area],2)&" m2"
6. Place "List.AddItemToEnd" node and connect them accordingly. Change Lacing to Longest for "List.AddItemToEnd" node.
7. You can skip this step. This is purpose of to sort by Level;
8. Export those data to Excel using "Excel.WriteToFile" node; That's all :)

Finished Datasets here
You may visit for more here

Schedule on those view and schedule on Sheets in Revit using Dynamo


This video will show you that how you can Create A Sheet Schedule (Excel Native Format) Based On the Views and Schedules You Have Placed on Sheets in Revit Using Dynamo

Finished datasets here


You may visit for more here

Monday 27 June 2016

Set Underlay Parameter to "None" for Floor Plan in Revit using Dynamo


PREPARATION:
First Download the "Archi-lab_Grimshaw" package.

WORKFLOW:
1.
Create a Temporary Level

2. Set Overlay Parameter to "Temporary Level"
3. Now you delete "Temporary Level" which just you created. As soon as you deleted "Temporary Level" Overlay Parameter will automatically changed to "None".
Download this script from here

Thanks to Dimitar Venkov

Wednesday 22 June 2016

Subtract Surface in Dynamo


This Tutorial will show you that How you can Subtract Surface in Dynamo.


You may visit for more here

Extract your Ramp Volume in Revit using Dynamo


Using Dynamo to Extract Volume of any kind of elements in Revit is very straightforward.

The following graph is for Single element.
The following graph is for Multiple elements.

Finished Datasets available here